 |
MAKING A BASIC AUTOCAD CUSTOM MENU |
Creating your own custom menu can be very useful in combining frequently used commands in AutoCAD. There are 2 ways to create your own custom menus in AutoCAD (at least from versions 2007+ anyway). The first way is to use the built in CUI (customisable user interface) that is built into AutoCAD. This gives users ease of creating AutoCAD menus by using drag and drop features. The second way is to use Windows Notepad (or similar program) to manually type out simple menu code. In this tutorial, I will be focussing on the manual typed method for creating a menu in AutoCAD (also my preferred method). I prefer this method as I believe it is much simpler and easier to control what you want your menu to do than the frustrating CUI method. It also means that you don't need AutoCAD to create the menu.
We will begin by opening Notepad.exe (if using Windows) or a similar program.
Once Notepad is open, let's save our file before commencing the menu. Save the file as MyMenu.mnu
Notice I typed .mnu after the filename (Fig.1). This is the filetype used for AutoCAD menus. There are other formats too but we will look at these later.
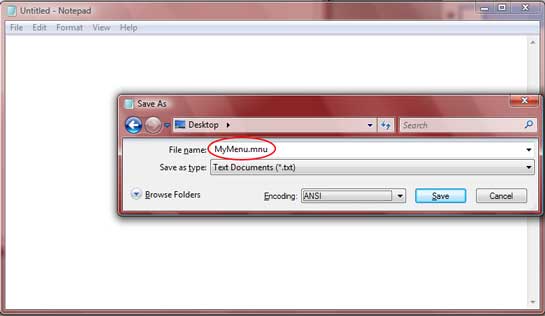
Fig.1
Ok, time to write something. In the below image, Fig.2, I have written some simple code that are the basic begginning's of creating an AutoCAD menu. Fig.3 shows what the menu looks like when in AutoCAD. So what does all this mean? Very simple, continue reading below the images.
 Fig.2 |
 Fig.3 (Menu in AutoCAD) |
***MENUGROUP=MyMenu
This first line tells AutoCAD we are creating a menu (***MENUGROUP) and it is called (=MyMenu). The first 3 stars are a basic format used in AutoCAD menus to tell AutoCAD that this is a menu, toolbar, image library. You will see later how this is used as a pre-fix to many AutoCAD menu identifiers. Note that the menugroup name cannot contain spaces, for instance MENUGROUP=My Menu would not work but you could type MENUGROUP=My_Menu
***POP20
This means the position of this menu in the AutoCAD along the menu bar. For instance, the FILE menu in AutoCAD is POP1 (first menu in the menu bar), next is EDIT which is POP2, next is VIEW which is POP3 etc. I have declared POP20 for our menu just so I can be certain this menu will appear at the end of all the other menus (unless you have 21 or more menus already). You can choose a different number if you desire to suit your needs.
[My Menu]
This is the name of the menu that you will see in AutoCAD menu bar (Fig.3). Note that this doesn't have to be the same name as the MENUGROUP declared at the start of the file. Unlike the MENUGROUP header, you can put spaces in the menu name anywhere between the brackets (as shown).
[Layer Create Menu]
This is out first menu item. At the moment, I have just shown the menu item name. The menu item won't actually do anything just yet as we haven't given any command information just yet. Note that you can call items on your menu anything you like.
[->Select Colour]
________[Red]
______[<-Blue]
OK, this is a little different, we now have a minus symbol with a greater than > and less than < symbol in this set of menu items. So what does it mean? The first item on the menu is [->Select Colour]. The word Select Colour is a simple menu item like any other, and can be named anything, but since we have put the -> in front of the name, it now means something different. The -> tells the AutoCAD that the menu item is to create a sub-menu. The sub menu contains the item menu names Red and Blue. (Refer to Fig.3 for clarity of how this works) When you move your mouse over [->Select Colour], the sub menu appears.
In the sub-menu, [Red] appears. This is the same as any other menu item command but is listed on the sub-menu instead of the main menu. Next is [<-Blue]. Again the symbol before the menu item name appears. This is telling AutoCAD that this is the last item on the sub menu. If we didn't tell AutoCAD that this is the end of the sub menu by using <- , AutoCAD would add all menu items after blue to the sub menus also. In this case, [About] would appear on the sub menu too.
[About]
This is another menu item. Again it can be called anything you like.
|
AUTOCAD MENU COMMANDS |
|---|
OK, now this is the basics for setting out the look of the Menu. But without commands it is nothing more than a visual display of would be commands. So let's add some functionality to the menu.
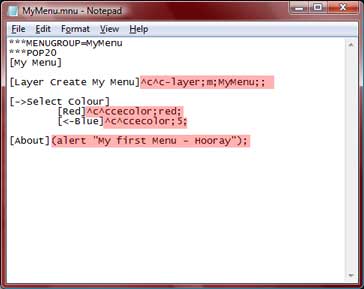
Fig.4
[Layer Create My Menu]^c^c-layer;m;MyMenu;;
This command will create a layer named 'MyMenu' and make it the current layer.
The first part of the command shows ^c^c. The symbol ^c is like telling AutoCAD to press the Escape (ESC) key. Pressing the escape key in the middle of an AutoCAD command will cancel it. However, in some cases, some AutoCAD commands require Escape to be pressed twice before being cancelled. That's why I have typed ^c^c.
So why do we call this first? Well, if you try and call this command in the middle of another command then it won't work. Imagine trying to create a layer when in the middle of the AutoCAD offset command. It won't work. Therefore we should always call ^c^c at the start of any of our AutoCAD menu item commands to cancel any current commands we may be in the middle of already.
Next is -layer;
-layer will call the AutoCAD layer command. Notice I have put - in front of the work layer. What this does is invoke a text based version on the command in the AutoCAD command prompt. The reason we do this is if we called layer without the - then the layer menu window would open but would not finish the rest of the command (i.e create a layer named MyMenu) In many cases you will need to add this to the start of many commands to make sure there windows or dialogue boxes don't open otherwise your command won't execute and complete properly. After -layer I have used the semicolon ; key. The semicolon is the same as pressing ENTER key or SPACEBAR. Just like all AutoCAD commands you type, you need to either press ENTER or SPACEBAR to initiate the command.
Next is m;MyMenu;;
After -layer; we now want to tell AutoCAD to make a layer called MyMenu. After initiating the layer command, there are many options. One of them is 'make'. So we call m; (make then ENTER) to tell AutoCAD we want to make a layer. Next we tell AutoCAD we want to make a layer named MyMenu. After that we tell AutoCAD to hit ENTER twice ;;. The first ENTER creates the layer and the next ENTER finishes the command. To understand how the progression works, try opening AutoCAD and typing the command at the command prompt, interchaning ; (semicolon) by pressing ENTER or SPACEBAR instead.
[Red]^c^ccecolor;red;
[Blue]^c^ccecolor;5;
This command changes the current pen colour.
Again we begin the command with ^c^c (ESC key twice). We then call the AutoCAD command cecolor; (cecolor then ENTER key ;). This asks us at the command prompt what colour we want. I have shown 2 examples of how this can be done. In the first case I type red;. AutoCAD recognises names of the standard colours as text (i.e RED, WHITE, YELLOW, CYAN, BLUE, MAGENTA, GREEN) The next command I use the number 5;. 5 is equal to BLUE in AutoCAD. This is useful for colours not listed above.
(alert "My First Menu - Hooray")
This command opens a dialogue box with the words My First Menu - Hooray (Fig.5)
Alert is a basic AutoCAD dialogue box you can use to give the user basic information. This command is enclosed in parentheses ().
Alert opens a dialogue box, any words between the quotations will be displayed on the dialogue box.

Fig.5
|
HOW TO LOAD A MENU IN AutoCAD |
|---|
OPEN AutoCAD. At the command prompt, type MENULOAD. A window will open showing all current MENUS installed.
Click on BROWSE and goto the location of where you saved the file MyMenu.mnu
Select the file then click OPEN.
Then click LOAD. If successful it will appear in the AutoCAD menu bar.
This wraps up the Tutorial for creating a Basic Menu. Refer to next tutorial for more on creating an AutoCAD custom menu.
>>>>2. AutoCAD Menu Item Help & Toolbars